Welcome to the first blog article in my new GA4 series! My mission is to help you make the most of your Google Analytics 4 (GA4) account, one blog at a time.
Did you know that out of the 28 million websites that currenly have Universal Analytics installed, only about 32% websites have migrated to GA4? This statistic shocked me because I was expecting more people to be annoyed by Google’s GA4 reminders! I wanted to start this GA4 series to share my learnings and tips from 16 websites I have migrated to GA4 so far, which will help you make the most of your GA4 account.
With that said, I am kicking off the series with a quick 15-minute audit you can do to check and tweak some settings in your GA4 Property and Data Stream configuration. By making these easy changes, you’ll be getting the most value from your GA4 settings.
Let’s dive in! ↓
The Checklist
To make it easier for you, I made an interactive checklist that you can use throughout the article to keep track of the audit.
For each checklist item, make sure to click the “Mark Done” button, and the checklist will be updated automatically.
GA4 Audit Checklist
- Change Data Retention Period to 14 months
- Enable Google Signals
- Link Google Ads account
- Link Google Search Console account
- Change Engaged Session Timeout to 30+ seconds
- Add unwanted referrals
- Add internal IP exclusions
- Add cross-domain referrals
Part 1: Property Settings
For the first half of the audit, we will be working in the Property section of Admin Settings. Go to your GA4 account and click on the blue cog at the bottom which will open Admin Settings.

Now that we’re in the right place, let’s get into the audit!
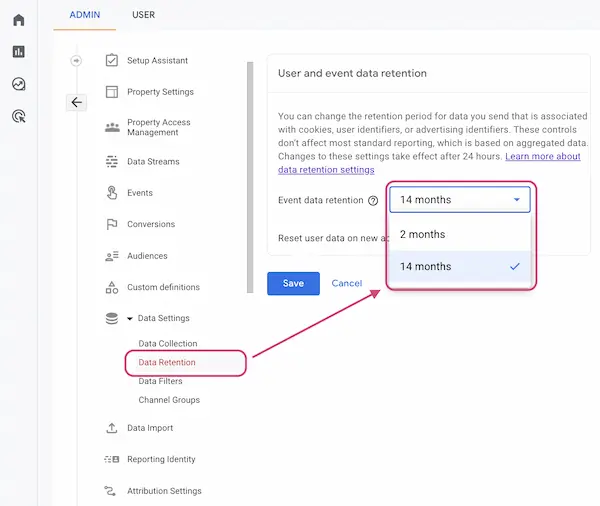
1. Change Data Retention Period to 14 months
First things first, let’s adjust your data retention period. By default, GA4 keeps each user’s event data for just 2 months, which is then deleted. Increasing the period to 14 months ensures that GA4 retains more historical event data and you can do year-over-year comparisons in Exploration reports.
Go to your GA4’s Admin > Data Settings > Data Retention, and change the retention period to 14 months.
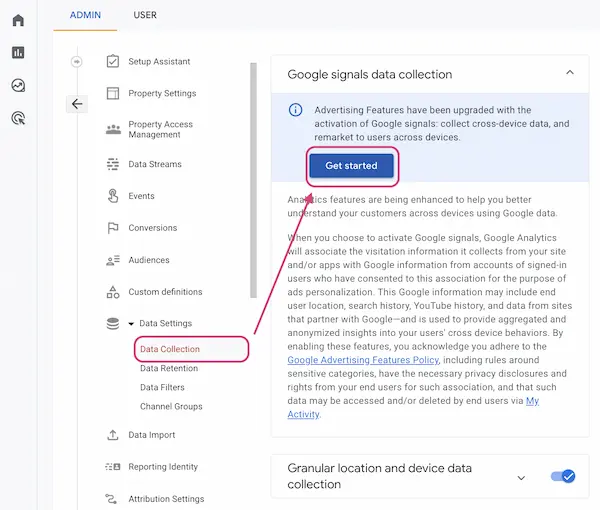
2. Enable Google Signals
Next up is enabling Google Signals. Enabling this feature unlocks improved cross-device reporting, access to demographics data, and remarketing.
To enable Google Signals go to Admin > Data Settings > Data Collection > Google Signals. If your “Get started” button is still blue, that means you still need to enable it. Click “Get started” and you’ll be guided through what Google Signal means and what it does.
Psst. The next blog in this series is a deep dive into Google Signals. Follow me on LinkedIn to get notified when it’s out!
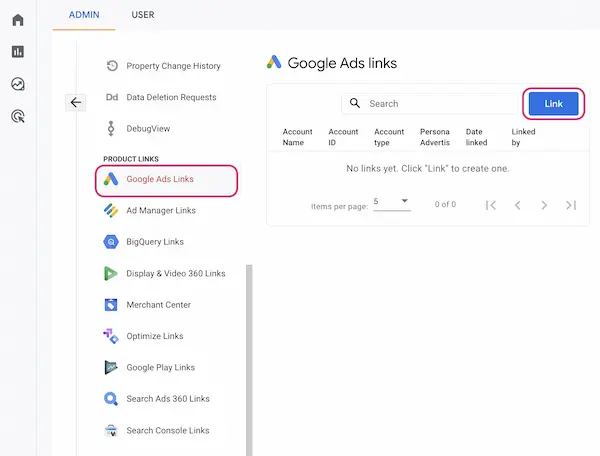
3. Link Google Ads account
If you’re using Google Ads, linking it to your GA4 account is a no-brainer. You’ll get access to detailed information on ad performance, conversion tracking, and advanced audiences for remarketing. If you are not using Google Ads, you can skip this step.
Go to Admin > Product Links, find Google Ads, and link your Google Ads account.
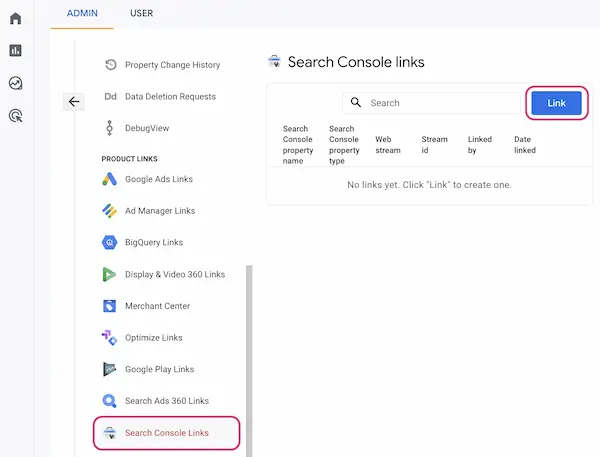
4. Link Google Search Console account
While you’re in the linking mood, why not connect your Google Search Console account, too? This will provide you with valuable insights into organic search traffic.
Go to Admin > Product Links, find Google Search Console, and click on the “Link” button.
Part 2: Data Stream Settings
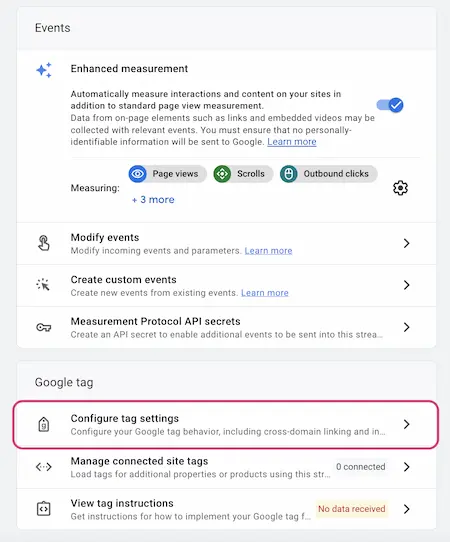
For the second half of this audit, we will be working in the Data Stream section of Admin Settings. In Admin Settings, click on “Data Streams”, which will reveal the Data Stream you should already have set up. Clicking on your Data Stream will reveal the Data Stream settings that you can see below. We will be making all the changed in the “Configure tag settings”.
Now let’s continue with the rest of the audit!
5. Change Engaged Session timeout to 30+ seconds
By default, GA4 considers a user session engaged after just 10 seconds of activity. Let’s be honest, that’s not enough time for a user to really engage with your content. I always recommend changing the Engaged Session timeout to at least 30 seconds to decrease the chance of idle users triggering Engaged Sessions.
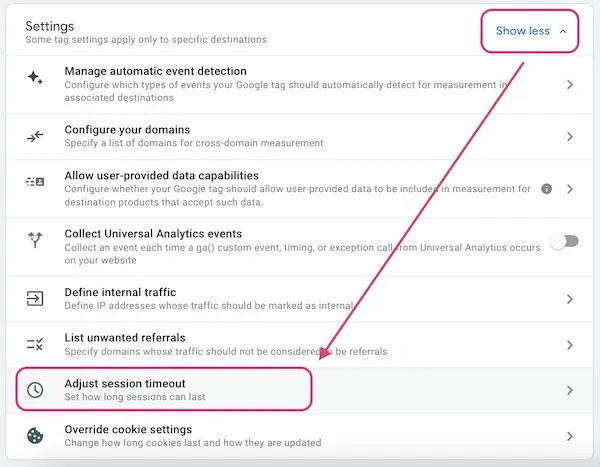
Go to Admin > Data Streams > Choose your data stream > Configure Tag Settings > Show All > Adjust session timeout, and set your desired time.
6. Add unwanted referrals
Referrals are any traffic that comes to your website from a source that is not a search engine or a direct visit (so any other website). spam can give you a false sense of traffic and make your referrals report look messy. To prevent referral spam from giving you a false sense of traffic, add any unwanted referral sources to the referral exclusion list. Unwanted referrals can also include any third-party connectors or services such as payment providers.
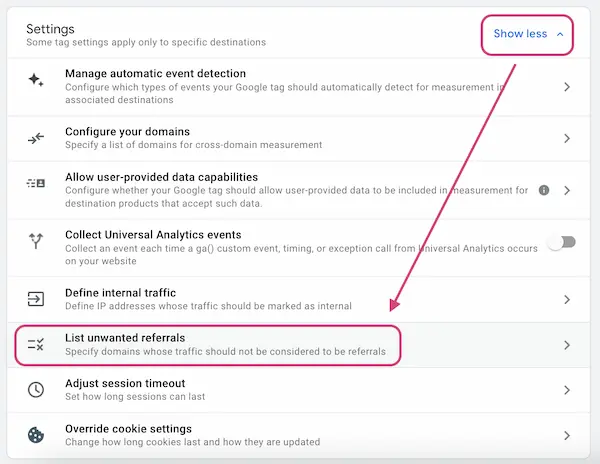
Go to Admin > Data Streams > Choose your data stream > Configure Tag Settings > Show All > List unwanted referrals, and add any unwanted referral sources.
7. Add internal IP exclusions
This one is important if you have a lot of internal traffic coming from marketing, content, or development teams for example. If their IPs are known (for example the IP address of the office), I would advise to exclude them to not skew your data with internal traffic.
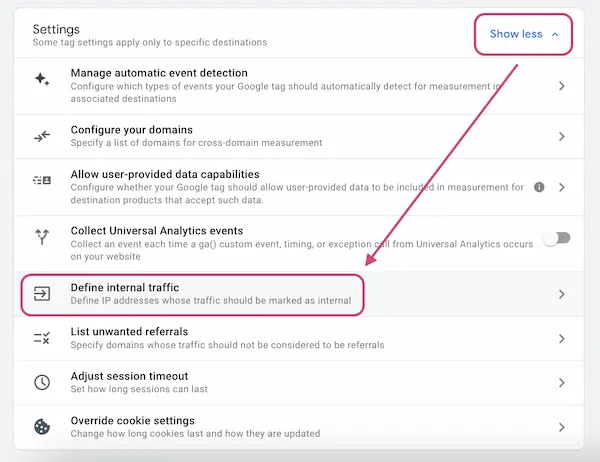
Go to Admin > Data Streams > Choose your data stream > Configure Tag Settings > Show All > Define internal traffic, and add your company’s internal IPs.
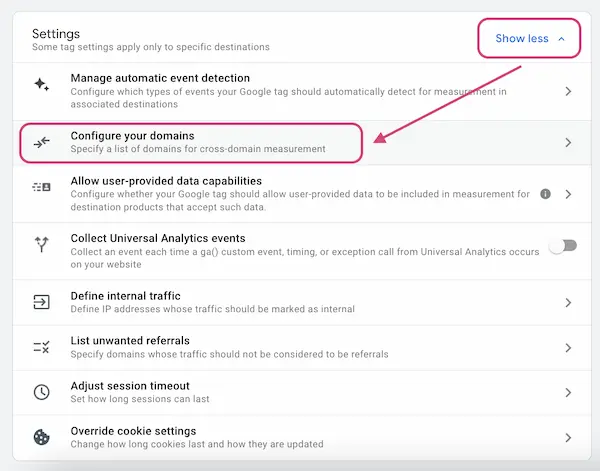
8. Configure cross-domain measurement
This is only applicable if you are tracking multiple domains, or have services that operate on third-party domains embedded on your site. This setting carries the relevant user identifiers across domains so the user is recognised.
Go to Admin > Data Streams > Choose your data stream > Configure Tag Settings > Show All > Configure your domains, and add any relevant domains.
Conclusion
And there you have it! In just 15 minutes, you’ve made some quick and easy changes to your GA4 property that’ll help you get more value from your analytics. I hope you were able to complete the audit in 15 minutes or less!
Keep an eye out for the upcoming articles in my new GA4 Series! The next blog post is a deep-dive into Google Signals and what it really means. See you there!
Need Help Understanding This Topic?
Don't let your questions go unanswered. I'm here to help explain any confusing or unclear parts in the article. Reach out for further explanation or clarification.

Anya Avdeeva
As a dedicated Marketing Ops and Analytics expert, Anya is deftly navigating the digital world and using her insights to close the digital analytics knowledge gap with her work and content.
AnyaWay Blog in a Monthly Newsletter
- Delivered once a month
- Packed with insights
- Unsubscribe any time